Left: before, right: after. Thanks to Helen Cathcart for these photos
We lived in our place for five solid years with the kitchen how it was when we bought it, which was absolutely great, though not to my taste at all – all shiny white units and grey laminate worktops – but the flat was brand new and un-lived in when we moved in, so we felt like we couldn’t justify changing it as it was perfectly functional, spacious and bright, and we also had to save up to make those changes. Eventually, we’d saved up enough money to redesign it, but were reluctant to rip out the existing kitchen as it would have been such a waste for it to just go to landfill when the units were still in really good shape, plus the L-shaped configuration worked really well for me.

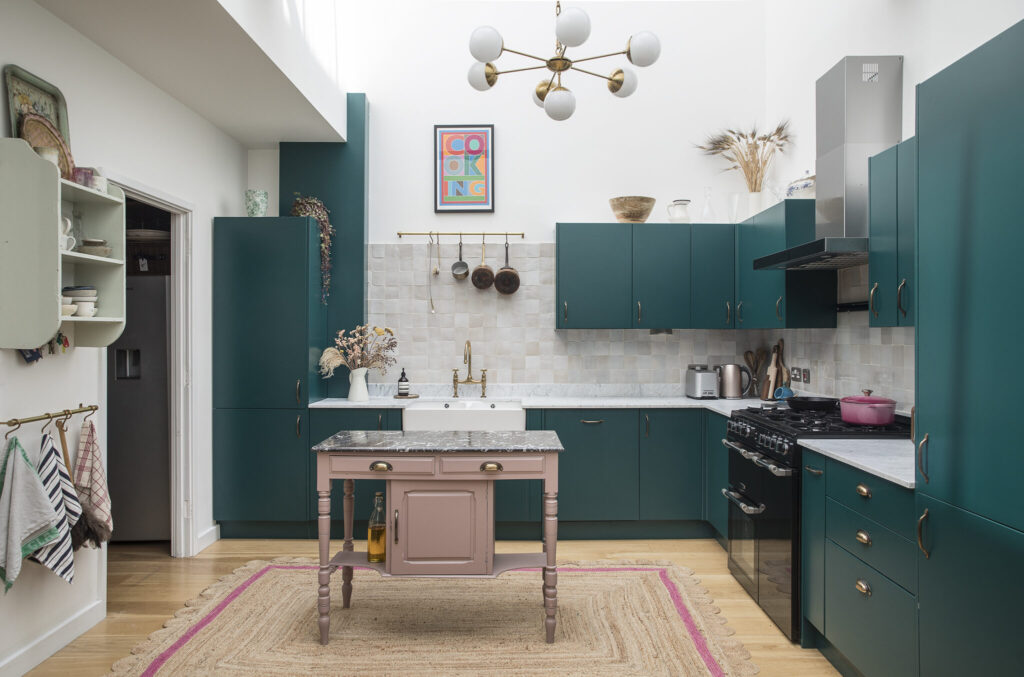
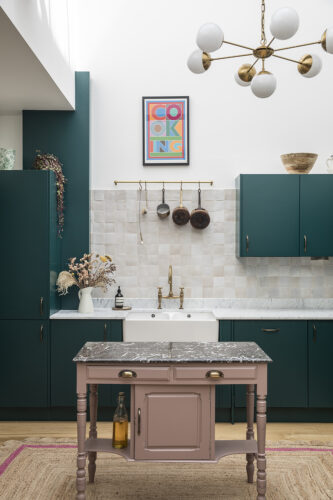
Initially I was looking at replacing the stark, modern cupboard doors with some more traditional style shaker units in a bold, deep green, and I had found some that I liked but wanted to get painted, so I called ‘Kiri’s Spray Shop’, a brilliant man in Wood Green who sprays cars and furniture beautifully. I told him about my plan, and he talked me round to keeping our existing units and spraying them instead. He pointed out that once we had sprayed them a matt colour and replaced the handles, they would be much more to our taste and it would mean sparing the waste and “saving the dolphins” as he put it. I had a very specific green in mind (inspired by this Devol kitchen which was firmly on my Pinterest board from the get go), which was a sort of forest green but with a teal edge, that looks different in different lights, and I couldn’t find it anywhere so eventually I just bought loads of sample pots and mixed the exact shade together myself. Kiri colour matched it from his encyclopaedic catalogue of spray paints and we were all set. We got a local builder (Joe’s Building Services) on board to help us dismantle the kitchen, and pull out a cupboard unit to make space for my new baby – a gorgeous sleek black Leisure Range Cooker with a double oven – I had been dreaming for so long about my own range cooker! I was so happy with the new green units, and to this day I get questions and compliments about the colour – but unfortunately it’s not a simple off the shelf shade people can replicate. The handles, a mix of cup and pull handles, are brass and came from Yesterhome, which is great for things like handles and screws.
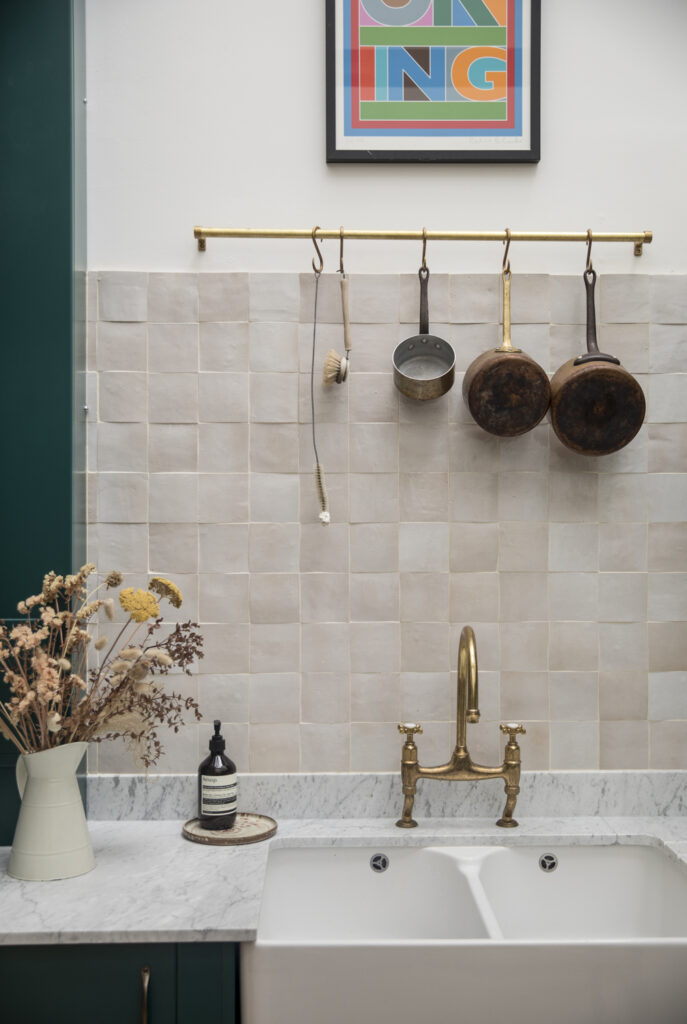
While the oven is obviously a crucial bit of kit, any food writer will tell you we spend just as much, if not more time washing up as we do cooking, so I decided to really go for it when it came to the sink and taps. I figured if I’m going to be washing up loads I want it to bring me joy – so I replaced the crappy metal sink with a gorgeous double ceramic Belfast sink from Villeroy and Boch and put in some really rather extravagant (but totally worth it) aged brass Ionian taps from Devol, along with a copper rail to hang my pots and pans. I’ve always fantasised about having a Devol kitchen, but for now I will settle with using some of their lovely accessories to suit my budget but still bring a slice of flair from their craftspeople.
Because our space is so white and modern, and has such an expanse of white walls, I wanted to introduce some more rustic textures and colour through tiling. I’ve been really charmed by the look of the handmade Morrocan zellige tiles for quite some time, and found some really gorgeous pearly pink ones from Mosaic Factory which were kindly gifted from the company, which I used as a splash back behind the sink and under the units to the cooker. I love how the tiles are slightly different shapes and thicknesses, and catch the light at different times of day. It makes for a really beautiful look.
One thing that was a real dream for me was Carrara marble worktops. I have always loved marble – the feel and heft of it, its coolness which means it’s so good for prepping pastry, and while so many people warned me against getting real marble because it stains, I would rather have real, natural marble that’s a little bit time-worn, than a synthetic version. It’s very personal because I know some people would be stressed by the fact it does get stained, but I’ve always loved old French and Italian kitchens with their ancient, rustic marble worktops. It’s such a stunning and enduring material and I liked the idea of introducing it into such a stark modern space. It actually worked out at about the same price as the synthetic alternative, which was a surprise to me – I bought directly from a stone warehouse via a local stone mason who installed it.
A big thing we wanted to do was convert the small utility room (something of an unloved dog hole that doubled up as a cramped storage for my ingredients) into a proper pantry. I was introduced to Ben Wheeler – aka @deringrestoration through Instagram and he came to have a look at the space, which is a very awkward little room because of various boxed-in pipes, which meant that off-the-shelf cupboards or shelving just wasn’t an option. I told Ben about my vision for a proper pantry with lots of shelves to house my dry ingredients, jars, cookbooks and spices, and he immediately set about sketching a design that maximised the space to its full potential, using the ceiling height for multiple rows of bespoke shelves, and drawing proper cupboard units build to fit the space, with worktops that would mean extra prep and work space for me.
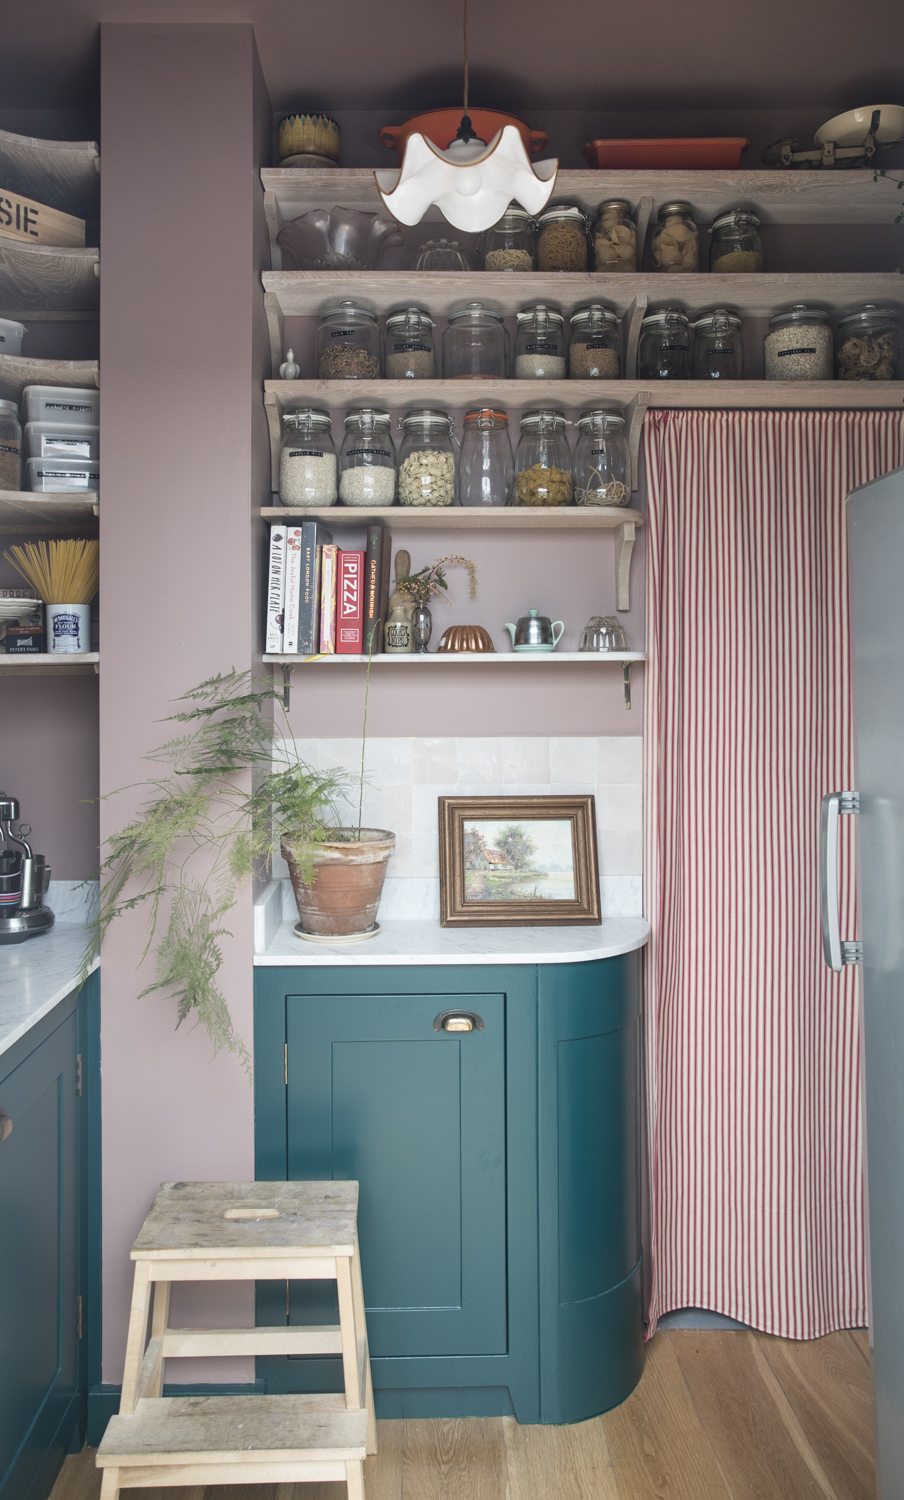
Working with Ben was a wonderfully creative and collaborative experience, and together we created my dream pantry – with Ben crafting bespoke, limed oak shelves that fit the space perfectly, and sturdy, handmade shaker units Kiri sprayed the same colour as the kitchen, then adding marble worktops to match the main room, and one gorgeous curved marble shelf. Because the rest of the space in the kitchen/living room is such a stark white, I wanted the pantry to be pained in a really bold colour, and Farrow and Ball Sulking Room Pink was the perfect shade for that. I made a red and white ticker stripe curtain to divide the space with some fabric I bought on Etsy to hide our little storage space where the washing machine and ironing board live, and hung it on a brass curtain rail bought from Hunter and Hyland.

Finishing touches
One thing I realised while planning the kitchen redesign, is that carefully chosen light fittings have the power to really finish a space, and I spent a long time looking for the perfect light for both the kitchen and the pantry. In the end I found a beautiful frilly, antique milk glass French style shade for the pantry from Vinterior, and a more modernist Sputnik-esque design with multiple lamps for the kitchen from Wayfair. I love how they both compliment each space and bring extra character.
Other finishing touches include a beautiful pink edged, scalloped jute rug from Tate and Darby, and an upcycled antique washstand found on Etsy which has the most beautiful black and white marble top. We had the legs extended by Ben to make it the right height for me to prep on and painted it Sulking Room Pink.
How long did it take?
The whole redesign took about four months in total, but we did everything ourselves in stages and were held up by the first lockdown too.
Top Tip
Create Pinterest boards and read interior magazines. Focus on the things you really love and build it around that. Also think about what you already have that can be upcycled – i.e can you spray paint your units or strip/varnish/paint existing furniture. Add texture and colour to modern, stark spaces with tiles and use natural materials like marble, metals or woods to bring in interest. You can follow me on Pinterest here.